
두리공장
[Spring batch] Step 9 - 배치시작을 위한 config 및 h2 메모리DB구성, 그리고 itemprocessor 사용 본문
[Spring batch] Step 9 - 배치시작을 위한 config 및 h2 메모리DB구성, 그리고 itemprocessor 사용
두리공장 2022. 6. 11. 15:41작업을 하다보니, 배치 시작을 위해 config 를 설정할 필요가 생겼다.
그리고 Batch용 DB 및 작업용 DB를 구분해야 하였다. (기존에는 DataSource 에서 직접 설정)
Batch용DB는 배치 종료시 사라져도 되는 메모리DB인 H2에 넣어야 하는데, Dbeaver와 같은 툴에서 접근하기 위해 별도의 설정이 필요했다.
그리고 ItemReader에서 읽거나 ItemWriter에서 저장한 후의 데이터에 대해 별도의 가공이 필요할 경우도 있었다.
그래서 이 포스트를 작성하게 된 것이다.
먼저 스프링배치를 기동할때 H2 메모리DB를 Dbeaver 와 같은 툴에서 접근하기 위해 아래와 같이 설정했다.
application.yml
spring:
  h2:
    console:
      enabled: true
      path: /h2
      settings:
        trace: false
        web-allow-others: true
  datasource:
    work:
      driver-class-name: org.h2.Driver
      jdbc-url: jdbc:h2:mem:userdb;DB_CLOSE_DELAY=-1
      username: sa
      password:

    mariadb:
      jdbc-url: jdbc:mariadb://localhost:3306/test_db
      username: root
      password: rootpassword
      driver-class-name: org.mariadb.jdbc.Driver
이렇게 한 다음에, DataSource에서 H2 메모리DB를 접근하기 위해 서버 포트를 개방해 주어야 한다.
package com.sunnier.batch.config;

import com.zaxxer.hikari.HikariDataSource;
import org.h2.tools.Server;
import org.springframework.boot.autoconfigure.batch.BatchDataSource;
import org.springframework.boot.context.properties.ConfigurationProperties;
import org.springframework.boot.jdbc.DataSourceBuilder;
import org.springframework.context.annotation.Bean;
import org.springframework.context.annotation.Configuration;
import org.springframework.context.annotation.Primary;
import org.springframework.jdbc.datasource.DataSourceTransactionManager;
import org.springframework.transaction.PlatformTransactionManager;

import javax.sql.DataSource;


@Configuration
public class DataSourceConfig {

    @Bean
    @BatchDataSource
    @ConfigurationProperties("spring.datasource.work")
    DataSource workDb(){
        try {
            Server.createTcpServer("-tcp", "-tcpAllowOthers", "-tcpPort", "9092").start();
        }catch(Exception ex){
            System.out.println(ex.getMessage());
        }
        DataSourceBuilder builder = DataSourceBuilder.create();
        builder.type(HikariDataSource.class);
        new HikariDataSource();//builder.build();
        return builder.build();
    }

    @Bean
    @Primary
    @ConfigurationProperties("spring.datasource.mariadb")
    public DataSource mariadb(){
        DataSourceBuilder builder = DataSourceBuilder.create();
        builder.type(HikariDataSource.class);
        return builder.build();
    }

    @Bean
    @ConfigurationProperties("spring.datasource.postgres")
    public DataSource postgres(){
        DataSourceBuilder builder = DataSourceBuilder.create();
        builder.type(HikariDataSource.class);
        return builder.build();
    }

    @Bean
    PlatformTransactionManager workTxManager(){
        return new DataSourceTransactionManager(workDb());
    }

    @Bean
    PlatformTransactionManager mariadbTxManager(){
        return new DataSourceTransactionManager(mariadb());
    }

    @Bean
    PlatformTransactionManager postgresTxManager(){
        return new DataSourceTransactionManager(postgres());
    }

}
9092포트로 접근할 수 있도록 성정하였다.
이렇게 해 두면, @Qualifier("mariadb") 로 DataSource 접근이 가능하다.
@Primary 로 설정해 두면 default DataSource로 동작한다.
    @Bean
    public JdbcBatchItemWriter<Post> jdbcPostBatchItemWriter(@Qualifier("mariadb")DataSource dataSource) throws Exception {
        return new JdbcBatchItemWriterBuilder<Post>()
                .dataSource(dataSource)
                .sql( "INSERT INTO posts (userid,id,title,body) VALUES ("
                        +":userid, :id, :title, :body)")
                .beanMapped()
                .build();
    }
H2 DB에 접근하기 위해 DBeaver 에서는 "H2 Embedded"를 추가선택하고,

이렇게 설정하면 접속이 된다.
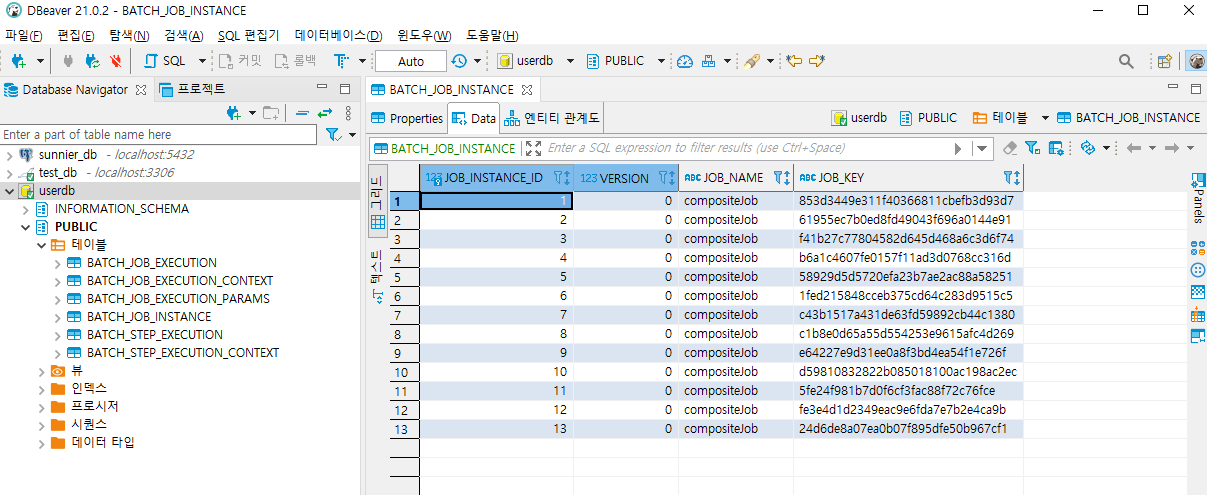
배치 인스턴스가 잘 보인다...
이전에 배치를 시작했을 때에는 application.yml 에 배치를 시작하는 Job을 설정했었다. (설정하지 않으면, @EnableBatchProcessing 내에 있는 모든 Job이 동시에 시작된다)
enable 를 false로 설정한 이유는 스케줄러를 사용하기에 배치 시작시 동작하지 않도록 하기 위함이다.
spring:
  batch:
    jdbc:
      initialize-schema: always
    job:
      names: compositeJob
      enabled: false
그런데 이번에는 JobLauncher를 사용해서 배치를 시작해 본다. (BatchApplication.java 에 등록)
   @Autowired
   JobLaunchar jobLaunchar;
   @Autowired
   Job job;

    //잡을 실행한다.
    @Scheduled(cron = "0 0/1 * * * *")
    public void perform() throws Exception {
        System.out.println("start JOB =============");
        JobParameters param = new JobParametersBuilder().addString("JobID", String.valueOf(System.currentTimeMillis())).toJobParameters();
        jobLauncher.run(job, param);
        System.out.println("finish JOB =============");
    }
잘 동작한다...
ItemReader나 ItemWriter에서 작업을 한 후, 해당 데이터에 대한 조작이 필요할 수 있다. 이럴 경우 ItemProcessor를 사용할 수 있다.
간단한 프로세서를 작성해 본다. 단순히 Ranking VO에서 name만 "song"으로 바꾸는 작업이다.(비즈니스 로직)
ItemProcessor<I,O> 에서 첫번째 인자는 입력받는 객체이고, 두번째 인자는 출력되는 객체이다(Map<key,value>와 모양이 동일하네??)
예제에서는 Ranking객체로 입력받고, Ranking 객체로 출력하게 해보았다.
    @Bean
    public ItemProcessor<Ranking, Ranking> customItemProcessor(){
        return ranking -> {
            ranking.setName("song");  //Reader에서 읽은 값에서 송이라고 이름을 바꾼다.
            return ranking;
        };
    }
이것을 Step에 붙이면 된다
    //스텝을 만든다(compositeItemWriter)
    @Bean
    public Step compositeStep() throws Exception {
        return this.stepBuilderFactory.get("compositeStep")
                .listener(promotionListener())
                .<Ranking, Ranking>chunk(1)
                .reader(rankingItemReader2(null))
                .processor(customItemProcessor())
                .writer(compositeItemWriter(null))
                .build();
    }
이렇게 하면 rankingItemReader2로 데이터를 읽어와서 customItemProcessor에서 조작(name을 송으로 바꿈)하고 그것을 compositeItemWriter에 전달할 수 있다.
끝.
스
'java' 카테고리의 다른 글
| [spring batch] 스프링 부트 프로젝트에 스프링 배치 이식하기 (0) | 2022.07.18 |
|---|---|
| 스프링 부트 프로젝트에서 OZ리포트 jar 라이브러리 사용시.. (0) | 2022.06.11 |
| spring job scheduler & shedLock 적용 (0) | 2022.06.09 |
| [Spring & jQuery] 파일 및 Json 데이터 업로드 (file & json data) (0) | 2022.05.30 |
| [Spring batch] Step 8 - 2개이상 write 작업수행을 위해 CompositeItemWriter를 사용하자 (데이터 출력을 위한 CustomItemWriter 작성 포함) (0) | 2022.05.26 |